ウィジェット : WordPress
カスタムなウィジェットを作成する際の覚書。
ウィジェットエリアが1つの場合
ウィジェットの設定 functions.php
register_sidebar();
functions.phpに上記のコードを記述する。コードを記述すると管理画面の[外観] > [ウィジェット]でウィジェットを設定できる。
利用可能なウィジェットをサイドバー1へドラッグして追加する。
ウィジェットを表示(テンプレートファイルに記述)
テンプレートファイルに下記のコードを挿入する。
<?php dynamic_sidebar(); ?>
register_sidebar($args)関数の詳細
register_sidebar関数は引数に配列($args)をとる。引数は省略可能。
省略した場合のデフォルト値は下記のようになる。
<?php $args = array(
    'name'          => sprintf(__('Sidebar %d'), $i ),
    'id'            => 'sidebar-$i',
    'description'   => ''
    'before_widget' => '<li id="%1$s" class="widget %2$s">',
    'after_widget'  => '</li>',
    'before_title'  => '<h2 class="widgettitle">',
    'after_title'   => '</h2>'
); ?>
初期値からわかるようにウィジェットはliタグでマークアップされる。見出しはh2タグでマークアップされる。
__()関数はSidebarをサイドバーへ変換する(日本語へ変換)。サイドバーが1つの場合はnameの値であるsprintf(__(‘Sidebar %d’), $i )はサイドバー 1となる。
またidの値はsidebar-1になる。
'name'          => sprintf(__('Sidebar %d'), $i ),
'id'            => 'sidebar-$i',
» “__()”関数や”_e()”関数とはなんぞや【WordPress】 – ウェブなとき。
» PHP: sprintf – Manual
dynamic_sidebarの詳細
<?php dynamic_sidebar(); ?>
ダイナミックサイドバー(ウィジェットが配置されるサイドバー)を表示する。ダイナミックサイドバーは下記の記載方法が推奨されている。
<ul id="sidebar">
<?php if ( !function_exists('dynamic_sidebar') || !dynamic_sidebar() ) : ?>
    <li>{static sidebar item 1}</li>
    <li>{static sidebar item 2}</li>
<?php endif; ?>
</ul>
» 関数リファレンス/dynamic sidebar - WordPress Codex 日本語版
ウィジェットエリアが複数の場合
ウィジェットの利用
register_sidebar(); // ウィジェットエリア1   サイドバー 1を表示する。
register-sidebar(); // ウィジェットエリア2   サイドバー 2を表示する。
ダッシュボード [外観] > [ウィジェット]にサイドバー 1・サイドバー 2が表示される。
利用できるウィジェットからサイドバー 1・サイドバー 2へウィジェットを追加する。
ウィジェットの表示
index.phpに下記のコードを挿入する。
<?php dynamic_sidebar(1); //サイドバー1を表示 ?>
<?php dynamic_sidebar(2); //サイドバー2を表示  ?>
カスタムウィジェット
<
p>ウィジェットには雛型が用意されている。
class My_Widget extends WP_Widget {
     function My_Widget() {
          // widget actual processes
          parent::WP_Widget(false, $name = 'MyWidget');
     }

     function form($instance) {
          // outputs the options form on admin
     }

     function update($new_instance, $old_instance) {
          // processes widget options to be saved
     }

     function widget($args, $instance) {
          // outputs the content of the widget
     }

}
//ウィジェットの登録[1]
add_action('widgets_init', create_function('', 'return register_widget("My_Widget");'));
widget($args, $instance)関数
widget関数の引数$args, $instanceはWordPressから渡される。
$argsはウィジェット情報、$instancdはフォーム情報が設定されている。
上記雛型を例にとると$argsには下記のような情報が設定されている。
 'widget_id'     => ○○○-N[2],
 'widget_name'   => ×××[3]
» WordPress ウィジェット API - WordPress Codex 日本語版
1. register_widget('My_Widget');でもよい。
2. ウィジェットの雛型を例にすると○○○はmy_widgetになる。Nは整数でWPが自動的に設定する。
3. ウィジェットの雛型を例にすると×××はMyWidegtになる。
簡単なウィジェット
著作者のリンクを表示するウィジェット


<?php
/**
My_Widget
*/
class My_Widget extends WP_Widget {
    /** constructor */
    function My_Widget() {
        parent::WP_Widget(false, $name = 'Author');
    }
    /** @see WP_Widget::widget */
    function widget($args, $instance) {
        extract( $args );
        echo $before_widget;
        echo $before_title . 'Author' . $after_title;
        if (!$instance['anchor']) {
                $anchor = 'FindxFine';
                $url = 'https://www.findxfine.com';
        }
        else {
            $anchor = $instance['anchor'];
            $url = $instance['url'];
        }
        if ($url) {
            $html = '<a href="' . $url . '">' . $anchor . '</a>';
        } else {
            $html = $anchor;
        }
        ?>
        <ul><li><?php echo $html ?></li></ul>
        <?php
        echo $after_widget;
    }
    /** @see WP_Widget::update */
    function update($new_instance, $old_instance) {
        $instance = $old_instance;
        $instance['anchor'] = strip_tags($new_instance['anchor']);
        $instance['url'] = urlencode($new_instance['url']);
        return $instance;
    }
    /** @see WP_Widget::form */
    function form($instance) {
        $anchor = esc_attr($instance['anchor']);
        $url = esc_attr($instance['url']);
        ?>
        <p><label for="<?php echo $this->get_field_id('anchor'); ?>"><?php _e('Anchor'); ?><input class="widefat" id="<?php echo $this->get_field_id('anchor'); ?>" name="<?php echo $this->get_field_name('anchor'); ?>" type="text" value="<?php echo $anchor; ?>" /></label></p>
        <p><label for="<?php echo $this->get_field_id('url'); ?>"><?php _e('URL'); ?><input class="widefat" id="<?php echo $this->get_field_id('url'); ?>" name="<?php echo $this->get_field_name('url'); ?>" type="text" value="<?php echo(urldecode($url)); ?>" /></label></p>
        <?php
    }
} // class My_Widget

register_widget('My_Widget');
// register My_Widget widget
//add_action('widgets_init', create_function('', 'return register_widget("My_Widget");'));
?>
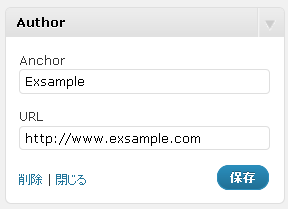
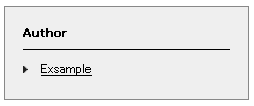
$instanceはフォーム情報が入っている。画像の例では$instance['anchor']はExsample, $instance['url']はhttp://www.exsample.comが設定される。
コメント
No comments yet.
コメントの投稿
改行と段落タグは自動で挿入されます。
メールアドレスは表示されません。